This guide explains how to review billable vs non-billable time in Worklog360, so you can understand how much work is generating revenue and where non-billable effort is happening.
Why this matters
Tracking billable vs non-billable time helps you:
-
Monitor revenue-generating work
-
Identify excessive non-billable effort
-
Validate billing before invoicing
-
Make better resourcing and pricing decisions
Worklog360 shows billable data consistently across all report views.
Where billable data is visible
Billable vs non-billable information is available in:
-
Time (Summary)
-
Worklogs (Details)
-
Timesheets
Each view answers a different question.
Method 1: Review billable ratio in Time (Summary)
Use Time (Summary) for a high-level overview.
Where to click
-
Go to Worklog360 → Reports → Time (Summary)
-
Select the time range and scope
-
Select a tab – Project, User, Issues or Account
What you will see
-
Billable vs non-billable ratio (column) for the selected grouping

-
A visual chart showing the split
-
Billable amount, calculated based on billable hours and rates
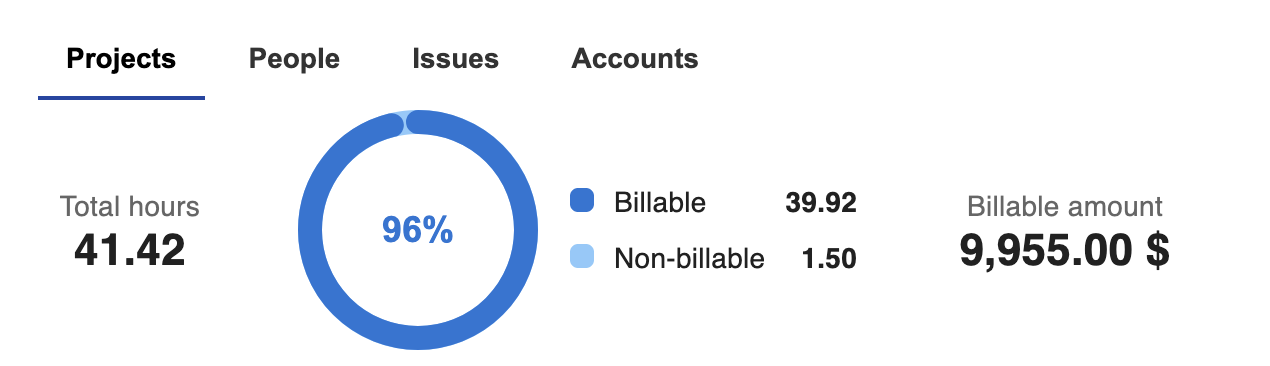
📌 This view is ideal for answering:
“How much of our time is actually billable?”
📸 Screenshot: Time (Summary) with billable vs non-billable chart
Method 2: Identify where non-billable work happens
In Time (Summary), change the grouping to:
-
Project → to see which projects generate non-billable work
-
User → to see differences across team members
-
Issues → to see differences across Issues
-
Account → to see account-level impact
-
Clients → (Tobe added), for now visible in Worklog Details (grouped worklogs by Client)
-
Teams → (Tobe added), for now visible in Worklog Details (grouped worklogs by Teams)
📌 Look for:
-
Low billable ratios
-
Projects or users with unusually high non-billable time
Method 3: Review individual worklogs in Worklogs (Details)
Use Worklogs (Details) when you need full transparency.
Where to click
-
Go to Reports → Worklogs (Details)
-
Set the time range and scope
-
Add the Billable column
What you will see
-
Each worklog clearly marked as:
-
Billable
-
Non-billable
-
-
Billable hours, rate, and amount (if configured)
You can also:
-
Filter by Billable = Yes / No
-
Combine with other filters (Project, User, Issue, Account)
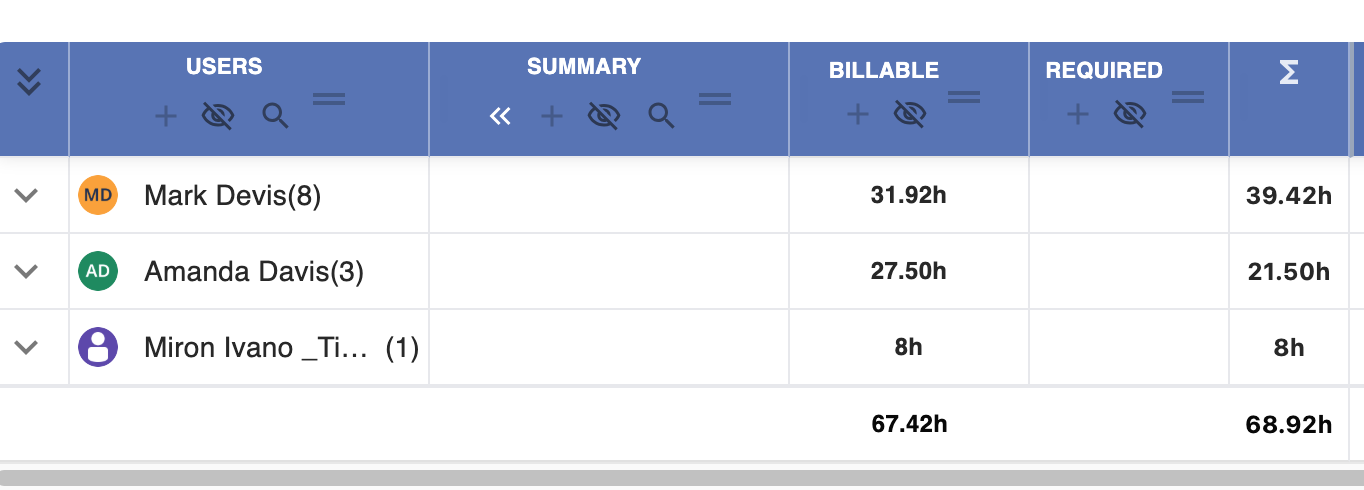
Method 4: Review billable time in Timesheets
Use Timesheets for per-user comparison.
Where to click
-
Go to Reports → Timesheets
-
Group by User
-
Select the relevant time range
What you will see
For each user:
-
Logged hours (SUM)
-
Billable hours
-
Clear comparison between the two
📌 This view helps answer:
“Is logged time actually billable?”
Common manager use cases
Before invoicing
-
Use Time (Summary) to review billable totals
-
Drill down into Worklogs (Details) if something looks off
During delivery
-
Monitor non-billable time to avoid scope creep
-
Adjust priorities or expectations early
Tips for managers
💡 Review billable ratios regularly, not just at month-end.
💡 Investigate sudden drops in billable percentage early.
💡 Use charts for trends, and tables for validation.